SQL 101: An Introduction to The Syntax
Table of contents
Big companies are fighting to gain more data, as it becomes the fuel of the digital age, in order to improve their operations and make informed decisions.
Data-related positions such as data analysts and data scientists are in high demand because they are able to extract valuable insights from the vast amounts of data being collected.
These experts are using SQL as one of their primary tools to manipulate and manage data. In this blog post, we will see the fundamentals of SQL which is an essential skill for those looking to pursue a career in any data-related field.
What is SQL?
SQL stands for Structured Query Language, a programming language used to manage and manipulate relational databases.
It gives us the ability to insert, update, retrieve, and delete data from a database. In addition to that SQL also allows us to create and modify database structures, such as tables, indexes, and constraints.

SQL was first developed at IBM in the early 1970s by Donald D.Chamberlin and Raymond F.Boyce at IBM's San Jose Research Laboratory. They created the first version of SQL, known as SEQUEL (Structured English Query Language), as a tool for managing data stored in IBM's System R relational database management system.
In the late 1970s, SQL was standardized by the American National Standards Institute (ANSI) and the International Organization for Standardization (ISO). This standard, known as SQL-86, defined the basic structure of the language, including the syntax for data manipulation and definition.
What is a relational database?
A relational database is a type of database that stores information in the form of tables, rows, and columns. We can make relationships between those tables in order to join and combine data from multiple tables.

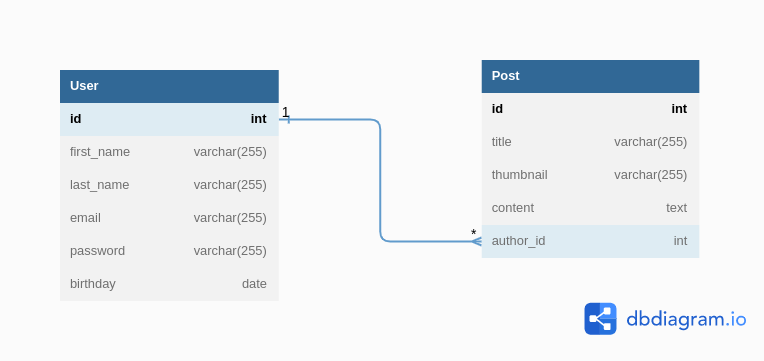
In this example, we have a relational database schema of a content management system.
As you can see, we have 2 tables User and Post, each one has its own attributes such as first_name, email, title, author …
The relationship between the 2 tables allows us to track the author of each post by linking it to a specific user using his ID.
You can extend this schema by adding more tables and relationships in order to track additional information within your content management system.
In brief, relational databases work by using tables, relationships, and queries.
A query is a question that requests information or makes modifications such as inserting, updating, and deleting data. SQL is the standard language for building those queries.
Create tables
Tables are the fundamental units of a relational database, so the first operation to be done is to create them inside the database. To do that we use the CREATE TABLE statement in SQL:
CREATE TABLE table_name (
    column1 datatype constraint,
    column2 datatype constraint,
    column3 datatype constraint,
    ...
);
We specify the name of the table and the list of columns, each column must have a type (int, float, text, date ...) and some constraints.
A constraint is a rule or a restriction that is applied to the data in a specific column. It ensures that the data in the table meets certain requirements or conditions. For example:
- PRIMARY KEY: Enforces a unique value and can not be null for each row in the column. Like an ID number.
- UNIQUE: Enforces that the data in the column must be unique across all rows in the table. Like user email.
- CHECK: Enforces a condition that must be true for the data in the column. For example, values in the age column must be greater than 18 yo.
- NOT NULL: Enforces that the data in the column must not be null or empty.
- DEFAULT: Sets a default value for the column if no value is specified when a new row is inserted in the table.
For example, to create the user table we’ve seen in the previous example, we would write:
CREATE TABLE User (
    id INT PRIMARY KEY,
    first_name VARCHAR(255),
    last_name VARCHAR(255),
    email VARCHAR(255) UNIQUE NOT NULL,
    password VARCHAR(255) NOT NULL,
    birthday DATE CHECK (birthday <= CURRENT_DATE)
);
This query will create a table called User with an id column that contains a unique identifier for each row in the table.
In addition to that, our table will contain first_name, last_name, email, and password columns all set to be strings with a maximum size of 255 characters. Note that the values in the email column are unique. This ensures that there will be no duplicate email addresses in the table.
Finally, the birthday column will contain values of type date (YYYY-MM-DD). It will be constrained by the check constraint to ensure that the birth date is not in the future, making sure that the data stored in the table is accurate and reliable.

Insert new data
Great, the schema of our database is created successfully, now we need to populate our tables with some data. In order to add new data to a table in a relational database, we use the INSERT statement:
INSERT INTO table_name (column1, column2, column3, ...)
VALUES (value1, value2, value3, ...);
The INSERT statement takes the target table name, the list of columns, and the corresponding values. For example, if we want to add a user to our User table we created before:
INSERT INTO User (first_name, last_name, email, password)
VALUES ('John', 'Doe', 'john.doe@provider.com', '12345678');
This query will create a new row in the User table and fill it with the provided data for each column:
- 'John' will be inserted into the first_name column.
- 'Doe' will be inserted into the last_name column.
- 'john.doe@provider.com' will be inserted into the email column.
- '12345678' will be inserted into the password column.

Retreive data
Now our database contains some data, our next step is to explore this data using the SELECT statement:
SELECT column1, column2, column3, ...
FROM table_name
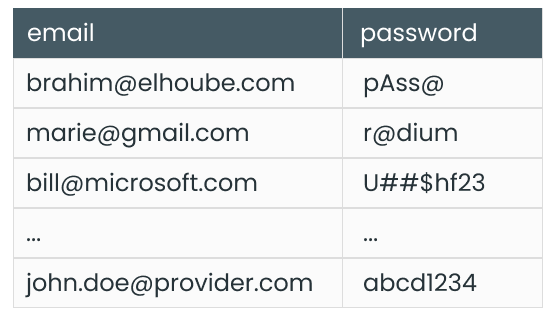
In a SELECT statement, we specify the table(s) name and target columns we want to read. For example, here is a query that returns emails and passwords for all users in the User table:
SELECT email, password
FROM User

You can return all columns by using (*). For example, this query will return all columns from the Post table:
SELECT \* FROM Post
We can do more with the SELECT statement, but I think that’s enough for the moment.
Filter data
We don’t select the whole table all the time, sometimes we need just a specific subset of data. For example, we can use data filtering to select all users that are less than 30 years old, or whose names start with the letter A.
This can be done using the WHERE clause in a SELECT statement, it’s used to filter rows based on a specific condition or set of conditions. For example:
SELECT * FROM User WHERE age < 30;
This query will return all users that are less than 30 years old. As you can see we used the comparison operator "less than (<)" to construct the condition.
We can also use logical operators to combine multiple conditions. For example:
SELECT * FROM User WHERE age < 30 AND first_name = 'John'
SELECT * FROM User WHERE first_name = 'John' OR first_name = 'Anna'
The first query will return all users who have the first name "John" and are less than 30 years old.
The second one will retrieve all users who have the first name "John" or "Anna".
If you’re familiar with programming concepts, the logic behind these queries is similar to what you already know.
Using aggregate functions
An aggregate function is used to perform a calculation on a set of values and return a single value. They are used to summarize data and provide insights into the data set.
Some of the most commonly used aggregate functions in SQL are COUNT, SUM, AVG, MAX, and MIN.
COUNT
The COUNT function returns the number of rows in a table or a specific column. For example:
SELECT COUNT(*) FROM User
SELECT COUNT(*) FROM User WHERE age < 30;
In this example, the first query will return the number of rows in the User table, while the second one will retrieve the number of users that are less than 30 years old only.
As you remark, we can use the aggregate function with filtered data.
SUM
It’s obvious that this function returns the sum of values in a numeric column. For example:
SELECT SUM(views) FROM Post
This query will return the total number of all posts views present in the Post table.
AVG
This function is used to calculate the average value of a numeric column. For example:
SELECT AVG(rating) FROM Rating WHERE product_id = 1
This query will return the average rating of the first product.
The average is the sum of all values divided by the number of rows.
MAX & MIN
As indicated by their names, MAX returns the maximum value and MIN returns the minimum value in a column. For example:
SELECT MAX(salary), MIN(salary) FROM Employee
You may have guessed, this query will return the highest and lowest salary in the Employee table.
Update data
In SQL we also have the ability to modify existing records in a database table. This is done using the “UPDATE” statement, it takes the table name, columns to be updated, and a condition to specify rows to be updated:
UPDATE table_name SET column_1 = value_1, column_2 = value 2 ... WHERE condition;
If the "WHERE" clause is not included, the entire table will be updated. It's a good practice to include a "WHERE" clause to limit the scope of the update, avoiding accidental changes to multiple records.
For example, the following query will update the age of John to become 32 years old in the User table:
UPDATE User SET age = 32 WHERE first_name = ‘John’;
You can use complex conditions and logical operators to specify the target rows in your update query.
Delete data
We can delete rows in SQL using the DELETE statement based on a specified condition. It takes the table name and the condition to specify which rows to delete.
DELETE FROM table_name WHERE condition
Similar to the update statement, if the "WHERE" clause is not included, all records will be deleted :)

For example, the following query will delete all posts that have less than 5 views from the Post table:
DELETE FROM Post WHERE views < 5
We can use complex conditions and logical operators to specify the target rows in our delete query.
Conclusion
Finally, we have covered the basics of SQL. We have seen how to create and fill tables with data. We have explored the usage of SELECT and WHERE clauses to extract and filter data from tables.
In addition to that, we learned how to use aggregate functions to summarize datasets and how to perform updates and deletes on tables’ rows.
However, the real power of SQL lies in its ability to retrieve data from multiple tables using JOINs, store and reuse code using procedures, and ensure data consistency using transactions. These are advanced topics that you may consider learning in your next step in order to become an SQL expert.
In summary, mastering SQL is an ongoing process. I know this may be confusing for beginners, but don’t worry, just some practice will make you more comfortable and less stressful.
